So I recently bought myself a new camera to commemorate the blogs popularity (obviously that's a lie haha), and to commemorate my new camera, I made a new pattern!
When I was making my bat hat, I looked around for a pattern for wings, but couldn't find anything that really worked, so I made some and thought of some other uses for them, and thus came the owl and snitch!
Without further ado here it is!
-------------------------------------------------------------------------------------------------------------------
Note: This pattern is for the wings and main body only, the entire pattern for the owl is coming soon, so check back.
Wings:
Ch 4 (leave longish end for sewing)
Rnd 1: skip first ch, sc 1 in each ch (3 total), ch 2, turn
Rnd 2: skip first ch, sc 1 in next ch, sc 3 in next 3 sc (4 total), ch 1, turn
Rnd 3: sc 1 in each (4 total), ch 4, turn
Rnd 4: sc in each (not in ch's, 4 total), ch 1, turn
Rnd 5: sc in each (4 total), ch 1, turn
Rnd 6: repeat Rnd 3
Rnd 7: repeat Rnd 4
Rnd 8: sc in each (4 total), Dont ch, turn
Rnd 9: skip first sc, sc in each (3 total), ch 1, turn
Rnd 10: sc in each (3 total), Dont ch, turn
Rnd 11: skip first sc, sc in each (2total), ch 1, turn
Rnd 12: sc in each (2 total), Dont ch, turn
Rnd 13: skip first sc, sc in next (1 total), Dont ch, Dont turn
Rnd 14: in spots along bridge (see below), sl 1, sc 5, hdc 3, sc 3
Fasten off leaving long end for sewing. Wings reach approximately 3 inches in length
Spots along bridge:
Mouse over to view spots
Simple body:
Ch 2
Rnd 1: sc 6 in first ch (6 total), Do not join Rnds, Mark end of each Rnd.
Rnd 2: sc 2 in each around (12 total)
Rnd 3: sc 1 in first, 2 in next, repeat 6 times (18 total)
Rnd 4: sc 1 in first 2, 2 in next, repeat 6 times (24 total)
Rnd 5: sc 1 in first 3, 2 in next, repeat 6 times (30 total)
Fasten off and stitch end in
Stitch Wings onto body to make a simple Harry Potter snitch!
You can purchase the owl here, the snitch here, and the bat hat here.
New hat up for sale in the Etsy store today! Sticking with the Halloween theme, the new hat features Frankenstein's Monster complete with neck bolts too! It was Carter's birthday today, so I thought I'd give him the first one. It fit the little monster well! Check out the Frankenstein Monster Hat!
You can buy this little monster now here, and keep checking for new patterns and hats!
That's a double pun right there. Okay, so mustaches are pretty popular now, and all I can grow is a dirty little fuzz-stache. So I made a pattern for me and everyone else who lack the necessary hormones to grow a great mustache! Here's a few photos of some different colors and my cousin posing with the finished product.
Ch 19
Rnd 1: sl.st 2, sc 1, hdc 2, dc 1, hdc 1, sc 1, ch 1 around next ch (see below for photos), sc 1, hdc 1, dc 1, hdc 2, sc 1, sl.st 3
Fasten off, tie ends together and sew them into the mustache. Tweak the ends up a little for a handle bar effect.
Now, I know its not July, but I was in the Christmas spirit and I've been meaning to make a good Santa hat pattern for my booth in October.
Oh yah, if you happen to be in the Thousand Oaks area on October 16th I'm having a booth at the 20th Annual Thousand Oaks Street Fair on Moorpark road! For more information and directions click here.
Anyhow, back to business. I made them in red and green, and I think I'm gonna put elf ears on them soon too! So anyhow, here's some photos of my cousin Sara wearing the Santa hats.
I don't have the pattern written down just yet, you're just gonna have to wait for Christmas I guess!


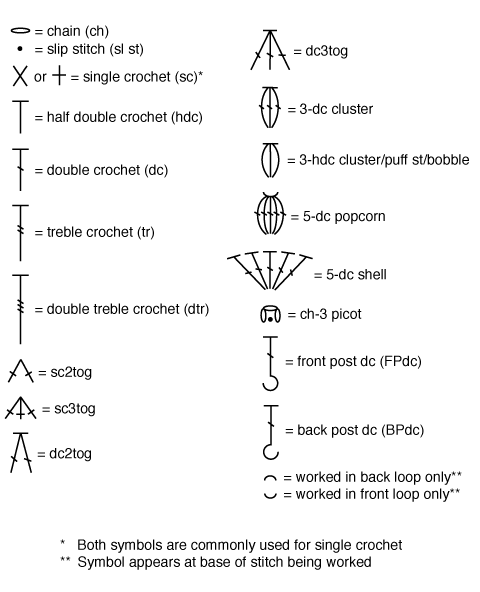
 for a symbol chart click here.


